Showing posts with label Bag. Show all posts

Wednesday, January 23, 2013

Partial Recap

So...it's been a bit.

We'll need to change the name of this blog, probably.

I've really restarted making stuff...though I never stopped? I just recently refell in love with the process of creation, and regained my will to make things and the desire to share it. And other things I'm still formulating.

Since my last post....almost a year ago :)...I've made (partial partial list)

  • About a millions EARRINGS- bottle caps mostly, but some fun things like these typewriter keys for a friend:
  • Bags - yes, plural. Just barely. The version 2 of the bag I mentioned in my last post:
 
 And a new similar bag based off a storebought one from years ago- just in the test phase now though:


  •  I've made a recent brief but intense foray into Aprons- here's my original 1.5 hr prototype:

And more recently they've gotten classy- though my favorites I don't have pics of here, I'll detail in another post.


  • And well, everything else. Including infusing vodka a bit, and etching flasks to store it!
 
And that doesn't even include food. My god, the canning alone.

More posts soon. Promise promise.

Wednesday, February 1, 2012

Sketchbook Project

So yesterday was the deadline to mail in your sketchbook for the Sketchbook Project 2012. I'm very proud to say I made that deadline, though I won't lie and say I wasn't tempted to email them and ask if I could just drop the book off later in the week. They are in Brooklyn after all...

Originally I'd settled on a sketchbook about my current project- making a copy of a bag I loved and destroyed:


It was supposed to be a guide detailing what I did from start to finish. Only problem: I wasn't going to finish the bag in time.

So I adapted it to being a guide through the first two muslins. Only problem: I accidentally cut out the second muslin wrong- the back panel pattern piece was flipped so it'll be a lefty bag instead of a righty and I had/have no will to finish it.


So I altered my idea again, to just being through that first muslin. Presumably I'd detail changes I was going to make in the pattern for the second. Here is the first muslin is question:


I was even going to include my pattern if people wanted to play along. This was my idea through Monday afternoon, the day before the deadline. Monday night I realized the draft I'd written up was terrible- it would just end up being pages and pages of words.

So I decided to scrap it. I worked out a plan to just do diagrams of most of the bags I'd made over the years, including inspiration and some construction notes. I worked out a quick draft Tuesday morning. I think I drew my first line in the actual sketchbook around 11:30am. I finished at 2:05pm. My hand is still sore.

I'm not thrilled at how it turned out- I was hoping to do a lot more- but given my time constraints I like the end result. Here's a sample page (yay for the fax machine at work's ability to scan and email things, since I didn't pay for it to be scanned by the people running the project):


Maybe one day I'll post the whole thing. For now you'll just have to view it in person. My Sketchbook's number is S66384 if you wanted to look it up during the tour.

Monday, November 14, 2011

Corduroy and Plaid Clutch

Were you aware that the most corduroy-y Corduroy Day was last Friday? In celebration I finally got around to making a new clutch, as my last one finally died- or at least, the pull came off the zipper and it was getting a bit dingy. I still used it for a month or so despite the hassle, as I always run my bags into the ground.

I used some corduroy I had left from my corduroy tie, as well as some plaid I bought ages ago with a project in mind that never came to fruition.


The lining is that same plaid.


I usually don't take the time to cut things on the bias, but for the plaid it makes the whole thing look so spiffy. Will have to try it with a few other plaids I've been saving.

The pattern is once again based off Noodlehead's gathered clutch tutorial, though I was too lazy to create the gathered front, as well as unsure it would work with this fabric anyhow. Per usual the zipper tabs ended up wonky, though I think less wonky than the first time. I think I finally understand what the directions say, so the third try may actually get the desired result.

And as the project came together so quickly I think I may make an extra to give to a friend. We'll see.

Saturday, July 9, 2011

Target Knock-Off (Part 1)

I have a philosophy about bags: if I can make it instead of buy it, I will.

Sadly my last bag broke- or, more specifically, the zipper did. In general though it was looking it a bit worse for the wear so it needed to be retired. After a (much much too long) hiatus using a freebie bag from work, a something Target caught my eye:

This is out of stock, oh well.

The outside was gorgeous, military inspired design; I just wasn't a fan of the lining. Not so much the color (I am a noted fan of bright orange- as you will see), but the feel of the material- a cheap, "what hunters wear so they don't get shot," kind of fabric. So one day I went into my local Target with my measuring tape and got all the pertinent dimensions.*

While my final plans for the bag involve some corduroy and gorgeous green leafy lining, I figured my muslin was the perfect place to start using up the giant stash of old jeans I've deemed too ratty to donate to Salvo. In addition I used stash fabric for lining, and some buttons that will look familiar if you checked out that last bag.

The result:


Inside with the first use of the C.R. Loves logo:


I used the last of the orange fabric to line the flaps, but there wasn't quite enough for the interior.

There are a few changes for my second mockup though:
  • Front pockets need to be bigger- they are mostly useless, just big enough to hold my work ID, metrocards, and maybe a few napkins
  • Needs interfacing or an interior support fabric...maybe? I tend to have those in bags, and I'm tempted to see what this would be like with more support
  • Should probably add that handle to the top flap
  • Bias tape! Didn't feel like messing with it on this one since I was more concerned about general construction, but feel like it's a good finishing detail I have yet to try on a bag
Hopefully I'll have time to work on this over the rest of the weekend. We'll see how that goes though haha...

*I'm not sure everyone could pull this off, but D works at Target and was standing next to me the entire time I did this so no one bothered me. Apparently though D ends up having to measure things all the time though for people shopping at the store, so I'm sure you could come up with an excuse. Or just buy and return?

Saturday, September 11, 2010

Yellow & Gray Part II

It's been over a month since the wedding I spoke of in my last post. August was such an incredibly long month.


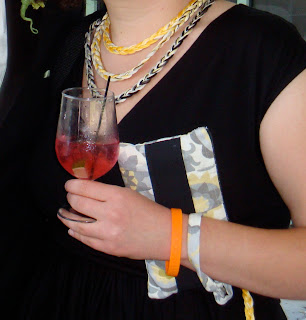
Anyway, the bag and necklace turned out pretty well. My sewing machine was acting wonky so I took the opportunity to go to Church of Craft's monthly meeting at Etsy Labs. Incredibly awesome space, very nice people. If anyone attended I was the girl sitting off to the side not talking to anyone- sorry! Really had to focus on finishing my project. Next time I'll be better.

Perfect size to hold what I needed!

As I wasn't home with access to the internet I basically winged the construction (it's Noodlehead's Gathered Clutch Tutorial) and paid a little for it. My zipper was too long, and the lining ended up a little bunchy somehow. But I still like it, and it's nice to have a little bag I can just grab when I run out for errands or whatever.

Can you spot the place I messed up?

The necklace was finished the night before, and it was nice but the area around the closure was messy. I think if I had longer hair things would've looked cleaner haha. And although I didn't get any "those are awesome!" comments at the wedding, I'm kind of proud I didn't get any "you made that- right?"s.

Action shot with vodka and cranberry. Yum.

An "I'm with Coco" bracelet is appropriate wedding attire, right?

Up next (hopefully soon, tho D and I are going out of town this weekend so who knows) a few little refashionings....well, one refashion and a rehemming....that I made on my birthday.

Tuesday, June 16, 2009

Pleated Purse

I have a long, illustrious history of making bags...well, sort of. Now and then I feel the need to make one, to either hold something I've acquired (a la my DS bag), or just to carry things around. They're never perfect but always serviceable, and now and then come out much better than expected. I also get better with each successive bag.

The pleated purse is originally based on a bag I spotted at a department store. I'm not a huge fan of leather and didn't feel like spending $70 on something marred with ugly logos, so I decided to make my own. Despite my inability to find the color I was looking for (which is a little sad, since that was main reason the original bag attracted my attention), I decided upon dark blue with a blinding yet classy orange lining. I also found some swank buttons that I was determined to work in.


Materials:
- 2 yds exterior fabric (I'm a huge fan of upholstry fabric)
- 2 yds lining (didn't use all of it)
- 1 yd support (you can use fusable interfacing, but I like canvas)
- Matching thread
- 3 zippers (two 7 inches, one 14 inches)
- 4 awesome buttons
- 2 D-rings
- 2 swivel hooks
- 1.5 yd of strap material

I am all for making things easy- or at least feasible- so despite my original inspiration, the final product ended up being mostly based on something I saw online. With more pockets. And my nemesis: zippers!

I will spare you complete diagrams of all my pieces and complete instructions- if you'd like them comment and I'll send them your way. Instead I'm highlighting some of my problems.

The big deal for me were the lining pockets, as I had never done one before. This bag actually has two, and while the both were successful the first one was a little rough. Just remember to give yourself an extra allowance around all edges to make sewing the back of the pocket easier, and try attaching the zipper with the heat bond strips for a cleaner look.

I also did things completely backwards, and instead of starting with the zippered top, I finished with it. This put a lot of strain on my cheap sewing machine- it actually stopped working for a while, but once it rested up overnight I was able to finish. Next time I'll do things the right way- but for this bag I was left with gross messy seams on top.

My swank buttons ended up coming in handy though- as I cut out (for lack of a better term) band aid shaped pieces of my exterior fabric, added button holes and wrapped those around the sides to hide those seams. It ended up looking much nicer than it should have.