When I sew, I have the terrible habit of putting pins in my mouth, mostly because I have no pin cushions. A lazy Sunday gave me the opportunity to create these mini pin cushion earrings with bottle caps, though I've had the idea in my head for at least the past two Mondays.
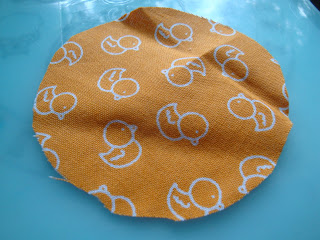
I love this fabric- I actually made a tie out of it a while back. So adorable, though you kind of look like a 6 year old going to church on Easter. Having some crazy idea turn out well is the best feeling in the world- and they're not too hard to make either.
Materials and Tools:
- Fabric (scraps)
- Bottle Caps
- Stuffing
- Earring Hooks
- Glue
- Pliers
- Scissors
- Needle/Thread
Start with a circle of fabric:
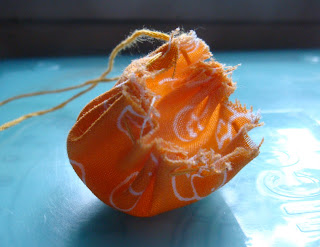
Use whatever needle and thread you have on hand (I had embroidery floss) to sew a quick running stitch around the outside of the circle.
Then tighten the string, creating a pouch.
Fill said pouch with your stuffing of preference and tie it closed:
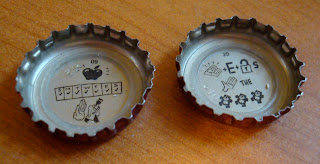
Create your bottle cap earrings with (the usual method)- making sure the inside faces front. These caps are plain silver ones we use for homebrew, I didn't take pictures of the other side- sorry!
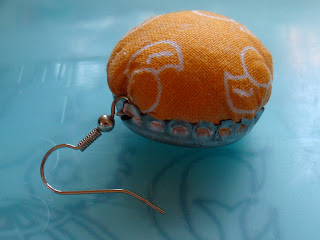
Put a big glob of glue in the cap and stuff the cushion inside, knot side down. I used Elmer's glue that takes forever to dry, so rubber bands came in handy:
Once it's dry, you have your adorable little pin cushions:
Now I won't have to worry about inhaling pins when I sew! Hooray!
Showing posts with label Bottle Cap. Show all posts
Showing posts with label Bottle Cap. Show all posts
Monday, August 29, 2011
Monday, August 22, 2011
Earring-A-Day 22: Otter Creek Macaroons
I knew there was a reason I love making bottle cap earrings- they're so easy! These are a bit more complicated than the normal method I'd been doing. Instead of the standard single caps I put two together with wire.
I think they kind of look like macaroons:
In that last pic you can kind of see how they were connected with head pins. I wish I'd had a single longer piece of wire- despite my best efforts they moved around (noisily) everywhere I went during work.
OCB stands for Otter Creek Brewing. Technically we got these caps from Wolaver's bottles- which is owned by OCB. Wolavers makes a lovely coffee porter, though their wildflower wheat is incredibly tasty, too.
Monday, August 15, 2011
Earring-A-Day 15: Troegs Caps
Today's are one of the more decorated caps I've seen: Troegs
All their packaging is similarly epic. I'm a big fan of coffee in beers, and their Javahead is pretty nice. Originally I'd had something else in mind for today's caps but when I went beer shopping over the weekend I remembered selection in North Jersey can be a little spotty, so I went with that.
And as I need two caps I picked up a Troegs I'd never seen before: Flying Mouflan
The description on the bottle really sold me:
We classify this beer as pushing Nugget Nectar off the side of a cliff. It is bold and intense–think hops dipped in candied sugar and rolled in dark chocolate nibs.It was tasty for sure, though it's kind of hard to live up to that description...
Monday, August 8, 2011
Earring-A-Day 8: Lionshead Bottlecaps
Lionshead. Such an awful beer. But so cheap! At this point in my life I have standards for what I'll pay to drink, and Lionshead doesn't really make it in the flavor department. Even though this new redesign of the outside of their caps is kind of cute:
The real selling point for this beer is under the caps- they have Rebus Puzzles!
Not too long ago a liquor store near my apartment had random cheap single bottles, so D and I picked up two. I've saved the caps for ages and they're today's pair...except I'm wearing them backwards. See last week for a tutorial. Here is my finished pair:
These were kind of easy, though for whatever reason the one of the left took me a while the first time I saw it.
Monday, August 1, 2011
Earring-A-Day 1: Flathead Lake Soda Bottlecaps
I'm happy August started on a Monday, it gives me a nice soft start to the month of earrings. Today's are this weird-looking drink that was on sale at the grocery store: Flathead Lake Soda.
Never heard of it before, but 99 cents for four bottles/two sets of earrings was a good enough deal for me. Sour cherry also sounded promising. It tasted alright, not nearly sour enough though- more like a cherry slurpee. The caps are pretty sweet though.
I've gone over the basics of making bottle cap earrings before, but never with pictures so let's do it again! You will need the following:
Materials and Tools:
- Hammer
- Thick nail (or an awl, if you want to get fancy)
- Pliers
- Scrap Wood (I use my cat's scratching plank)
- Bottle Caps
- Earring Hooks
Any bottle caps will do, but twist off is obviously much easier.
First, decide which direction will be up on your caps and hammer the nail through the edge of the cap. Try to get the hole in the middle of the side, if a little closer to the edge. Too far in and you won't be able to get the hook attached.
I was going to get D to hold the nail for this picture when I realized to get the size hole I needed I could just let the nail do the work:
This is why the scrap wood is necessary, unless you like destroying your table. Then it's simply a matter of plier-ing the hooks open and putting the caps on.
Ta da:
One day down, hopefully the rest of the month will be this easy...
Wednesday, February 18, 2009
Bottle Cap Earrings
 I borrowed (i.e. stole) the idea for this from a friend of mine, who gave me a pair of Corona caps her little sister had made. Everyone loves bottle cap earrings- except, perhaps, the school where that sister went. Apparently they didn't approve of mixing tweens and alcoholic paraphernalia, and the earrings were banned. That shouldn't stop you from promoting your favorite beer, though.
Required:
-Bottle caps*
-Earring hooks
-Hammer
-Thick Nail
-Pliers
-Scrap Wood
Any bottle cap will do, though obviously twistoffs are easier to prepare. If your beer requires an opener, be careful. Don't use ones that are pointy (I've found this style works best), and don't try and open it in one go. Lift slightly, turn the cap, lift slightly again, etc.
Once you've removed your cap, decide what direction should be up and place the tip of your nail on the inside of the cap. I've found the closer it is to the edge, the easier it will be to attach the loop. Hammer 'til a hole of your liking appears. **NOTE** DO NOT do this on a nice table. To get a decent sized hole you will leave a dent in the surface upon which you are nailing. Hence the scrap wood.
Use the pliers to open the bottom of your earring loop. Slip on the cap and check that it's facing the right direction before closing the gap.
*While the point is to promote what you like, I've found some good graphic caps can be found with: Hitachino's Nest (pictured), Newcastle, New Belgium Brewery, and Rogue.
Subscribe to:
Posts (Atom)


